Introduction
Hello again! A lot has happened over the past few weeks and we have achieved a milestone that I feel comfortable in talking more about. More precisely, NVK is now multi-plane format ready, YCbCr formats are advertized and supported, and YCbCr sampler support is being worked on now. Today, we’ll be covering the very first point, which is the first and biggest stage in our project, entailing a refactor in almost everything that works with images. I spoke a bit more about it in my previous post, but as a quick recap: loosely speaking, multi-plane support is about changing the image code so that each image object is capable of representing multiple images (planes) at the same time, with each plane holding part of the information the image is supposed to carry. So, lets see how all that went now and what it involved!
The NVK codebase is neatly split and organized according to the functionality the code covers, so this article will follow that same organization as we go through each file in order, with each section covering a file. Also, to try and make this a bit more general and easier to read for people non-familiar with Vulkan, I’ll briefly go over the Vulkan concepts involved before discussing the changes, so people more experienced here can probably skip the first paragraph in each section.
nvk_image: There Are Images In Your Image
In Vulkan speak, Images, or more accurately, VkImage objects, are multidimensional (1D, 2D, or 3D) arrays of data representing images which are used for various purposes such as textures or attachments by binding them to a graphics or compute pipeline through descriptor sets. One such usage can be for video applications, which use special color formats and encoding that have an image split into multiple planes, each plane essentially being a part of the information the image represents, with the combination of all planes giving you the full information and hence, image. In other words, planes are for all intents and purposes images themselves; they just hold only a part of the information.
Given that, the most natural entry point to our project here is the nvk_image object (the driver’s interpretation of VkImage) itself, and its associated functions which directly manipulate it. In NVK, our image object consisted of an image surface – which basically is the image itself – and memory objects for the image as well as a memory offset. Following up from the info above, the natural approach that occurred to me is to wrap all of that in a nvk_image_plane object, and then nvk_image would initialize plane_count of those, with plane_count derived from the format the image is encoded in.
However, there was a decision to be made here that came up during code review: was this really the best way? Extracting plane_count and then creating and initializing only that number of planes was most efficient, yes, but it also opened us up to potential memory safety issues if a code snippet somewhere tried to access a plane that doesn’t exist (Memory access violations? In my C code? Why, I would never! C is perfectly fine and safe). Furthermore, the efficiency gains weren’t really that large; the memory footprint cost of always creating 3 image planes relative to the size of a VkImage was almost negligible and not worth the potential safety issues. So in the end we settled on always creating 3 planes.
   struct nvk_image_plane {
   struct nil_image nil;
   struct nvk_device_memory *mem;
   VkDeviceSize offset;

   /* Used for internal dedicated allocations */
   struct nvk_device_memory *internal;
};
struct nvk_image {
   struct vk_image vk;

   /** True if the planes are bound separately
    *
    * This is set based on VK_IMAGE_CREATE_DISJOINT_BIT
    */
   bool disjoint;

   uint8_t plane_count;
   struct nvk_image_plane planes[3];
};
Following that, the rest of the things related to VkImage were fairly straightforward and trouble-free; for instance, instead of initializing just an image in the init code, we would loop over all the planes to initialize each one separately, things like that. And it makes sense, really – the code already did the work; it just did it for a single plane. The only other main challenge I would say was setting up the memory objects for multi-planar images properly (i.e., calculating size and offset) and binding images to device memory, as I struggled a bit with understanding how this was supposed to work and I actually ended up getting that wrong first time due to a misunderstanding of the core spec. Thankfully, however, it was caught very early on in code review.
There are two types of multi-plane images; disjoint images, and non-disjoint images. ‘Disjoint’ means that the individual planes of an image are bound separately to distinct device memory objects, and thus each plane has its own memory binding, with the application being the one responsible for ensuring that all the planes are bound. Non-disjoint images, on the other hand, have all the planes bound together to one memory object, and so have only a single memory binding. So basically, you’d have to loop over all the planes and set up your memory object as you go. My initial mistake and misunderstanding here was that I thought that all I had to do was just make it so that all planes’ memory objects were the same, which was very wrong and completely messed things up.
Other than that, nvk_image was basically painless and straightforward. Onto the next stop – nvk_image_view!
nvk_image_view: A Bite of Your Image
So hold up now, what is an image view anyway? Well, see… shaders can’t actually directly work on image objects. Instead, Vulkan exposes VkImageView objects which are basically pieces of VkImage objects that shaders can work on. In other words, an image view is a subset of an image that shaders can directly access and modify. Think of it like pizza: you can’t just eat the whole pizza (image), you have to cut it into slices (image views) first and eat those. No, I am totally not hungry at the moment, why do you ask? This may all sound a bit strange, but this split does allow for some nice flexibility and can also enable some cool effects by allowing things like reinterpreting the format of an image (i.e., a VkImageView with a different format than its derived VkImage). This can also all backfire horribly if you aren’t careful, but where’s fun in life without a little bit of risk?
The image view changes were, for the most part, fairly simple and painless like the image changes. There was just one relatively simple challenge; in nvk_image, we’d initialize every single plane because we were concerned with the whole image. In image views, we’re concerned with only a subset, so how would initialization work, how would we know which subset we needed? Vulkan allows the application to select the needed subset (planes) by an aspect mask passed in through a struct, which is a bitmask where the bits turned on would specify which part of the image the shader needed. There was no other mechanism, so now I had to think of a clean and neat way to loop over a bitmask that would work with the existing code. I wouldn’t call this hard per se, just different and… unique in a sense. And in the end, I settled on this bit manipulating monstrosity I was proud of:
   // Expand the aspect mask to get all the planes in the image, then loop through all these planes
   u_foreach_bit(aspect_bit, view->vk.aspects) {
      /* The plane index is the number of bits in all the aspects before the aspect bit as
      plane indices are kept in aspect-bit-order */
      const uint8_t plane = util_bitcount(view->vk.aspects & ((1UL << aspect_bit) - 1));
      view->planes[plane].image_plane = plane;
      // Fill in the view plane
   }
The utility helper function would do most of the hard work for us by getting the needed planes from the mask and walking through each one, while the original code just had to have some light modifications so that it could be placed in the loop – all in all, not bad. However, this monstrosity had a fatal bug. If you’re familiar with this part of Vulkan, you may have already caught it. If not, try taking a moment to think about it for a bit before reading on; it’s not actually that hidden in hindsight.
See, the aspect mask isn’t just for multi-plane images; it can be used to specify any subset of an associated image, and that subset could be depth/stencil components, which are actually two separate bits in the mask. In other words, the above logic would treat depth-stencil as an image view of two separate planes and walk through them, which is clearly very wrong. After some thinking with Faith, we ended up with this elegant beast instead, which both takes care of this issue and is also cleaner:
   /* First, figure out which image planes we need.
    * For depth/stencil, we only have plane so simply assert
    * and then map directly betweeen the image and view plane
    */
   if (image->vk.aspects & (VK_IMAGE_ASPECT_DEPTH_BIT |
                            VK_IMAGE_ASPECT_STENCIL_BIT)) {
      assert(image->plane_count == 1);
      assert(nvk_image_aspects_to_plane(image, view->vk.aspects) == 0);
      view->plane_count = 1;
      view->planes[0].image_plane = 0;
   } else {
      /* For other formats, retrieve the plane count from the aspect mask
       * and then walk through the aspect mask to map each image plane
       * to its corresponding view plane
       */
      assert(util_bitcount(view->vk.aspects) ==
             vk_format_get_plane_count(view->vk.format));
      view->plane_count = 0;
      u_foreach_bit(aspect_bit, view->vk.aspects) {
         uint8_t image_plane = nvk_image_aspects_to_plane(image, 1u << aspect_bit);
         view->planes[view->plane_count++].image_plane = image_plane;
      }
   }

   /* Finally, fill in each view plane separately */
   for (unsigned view_plane = 0; view_plane < view->plane_count; view_plane++) {
      const uint8_t image_plane = view->planes[view_plane].image_plane;
      // Fill in view plane
   }
One more thing worth mentioning, although this is more general and not really image view related, it was just especially noticeable here during code review, was that I would take a lot of data for granted without first checking (asserting) that it was valid. This is a bit important as it’s a big time saver later on in case I wrote something wrong somewhere, where asserts would quickly help identify where things went wrong.
Aside from this, nvk_image_view wasn’t troublesome and the aspect mask was basically the sole “challenge” here, so to speak. So, onto the next stop, shall we? Huh.. what? We’re going where? Oh… oh.
Descriptor Hell: Full Dunning-Kruger
Desc-.. Descri-.. Descriptors.. yeah. Descriptors.
 The face of a young man when reminded of descriptors. Character is Emil Sinclair from Limbus Company. Credits to Project Moon
Descriptors, and descriptor changes were probably the toughest part in all of this for me, and the part that took me the longest all in all. But before getting into why, lets quickly go over what exactly descriptors are. Resource descriptors are essentially handles for shader resources like buffers, samplers, image views, and so on; if a shader can work on it, it has a descriptor. Descriptors are then grouped up in descriptor sets, and the specifics about how they’re grouped up such as the elements and their numbers, the size, and so on – the layout of the set – are defined by descriptor set layouts.
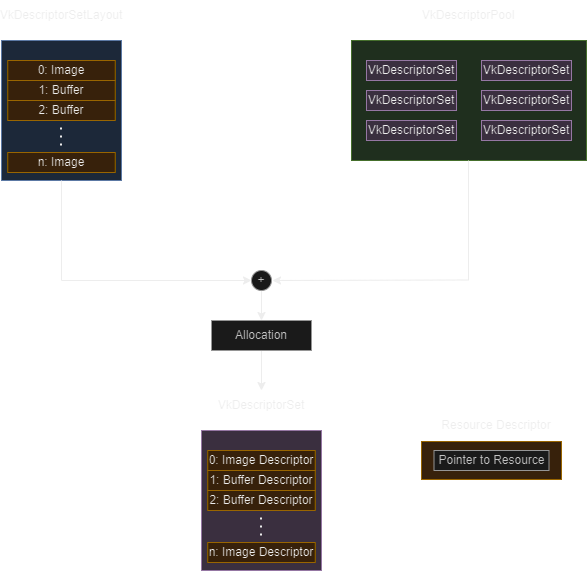 This is actually a bit convoluted, so here’s a simplified diagram. Not mentioned in the intro: you allocate descriptor sets from a descriptor pool.
Given the nature of our work here, what concern us in this part are naturally image view descriptors and sampler/combined image sampler descriptors. However, we won’t be focusing too much on the latter for now as that comes when sampling is properly implemented; we merely need to do some setup work until then.
Coming from the short introduction above, our work here sounds simple enough: we’ll need a descriptor for each image view plane (remember: planes are basically images), and the descriptor set layout will need to change to allow for plane_count descriptors in the descriptor set when multi-planar images are specified in a layout. At a higher level, that was basically it. Simple enough… or so I thought.
At a lower level, however, things were more complicated. The first challenge was actually first having to understand the code here and how it all worked together, which wasn’t easy as one would expect given descriptors are in the awkward spot of being not exactly low level constructs, but also not high level. To make things harder, when trying to look at how other drivers (mainly ANV and RADV) did it, each of them had a different way of doing things which further added to my confusion.
Another challenge was fully grasping the spec’s requirements in this part, mainly how there are quite a few special cases and things to be aware of, some of which I didn’t fully know and only realized while working, some of which I knew while reading up the spec, but didn’t properly grasp nor understand their implications until a bit after.
Finally, the harder challenge was concerned with making design decisions that could impact things such as performance, code cleanliness, and even potentially railroad future changes into a particular direction which may end up not good in hindsight. This ranged from simple decisions like “what should I expect the nvk_sampler object to provide me?” to things a bit more complex like calculating the stride for multi-planar descriptors in the descriptor set layout. The latter actually stood out in particular; a descriptor set has multiple descriptors, so you may end up in a situation where you have multiple multi-plane descriptors, and to get the stride between them, you’d have to go through each of them and get the stride as you go, which was quite complex. Taking a look at ANV and RADV, I noticed that both do a rather clever trick of getting the maximum number of planes in the whole descriptor set, then the stride . Of course, this is a bit inefficient as you end up wasting some slots, but we deemed it an acceptable tradeoff given YCbCr usage isn’t really that common in reality, so the code savings more than made up for the inefficiency that would pop up.
To sum up all the above, I was basically stuck looping on the curve below:
 Stuck in a loop going from “Huh?” to “We got this” to “We don’t got this at all” to “We’re so back now” and then “It’s all so over” and then looping back
It didn’t help that I was a bit stubborn as well and insisted on going about this solo without asking around as much as I could, and to make matters worse, every setback and wall I’d hit would make me feel even worse about myself and skillset. All in all, not a good time. After finally being convinced I had hit a dead end with regards to a few issues I was having, I went to Faith with my findings. She then clarified the issues I was having very clearly, answered my questions, and we had a clear outline of what needed to be changed and things just went fully smoothly after that.
A really important takeaway from all this here is that there’s really no issue in not knowing something or struggling with something new or unfamiliar. In other words, one should know their own limitations and work around them and try to improve, but strictly speaking, there are also no problems or issues in having these limitations in the first place – in fact, it’s only natural. Rather, the important bit is the desire and willingness to improve and eventually overcome said limitations. What added to my struggles above is how I was stubborn because I felt nervous and incompetent because I was struggling, which only made things worse and worsened that feeling too, while I could have instead accepted that and sought help earlier.
And with all that, we can head on to our final stop – rendering/copying operations. As for descriptors, well… I am currently working on sampler support, and there’s going to be a [small] re-visit to descriptor hell again: this isn’t over you bunch of glorified pointers!
Meta Operations: Draw and Copy
Meta operations here refers to the commands used for rendering, copying, and clearing. The changes here are more of a side-effect, really, as these operations are all single-plane exclusive (in fact, clearing didn’t even need to be modified). The change introduced here by multi-plane support is that instead of working on the sole image plane you had, you now have to extract and check the aspect mask (the very same one from the nvk_image_view section above) for the specific plane you’ll be working on before carrying out the operation. As such, this part was the easiest and quickest to deal with, with the most minimal code changes.
This is another part where the benefit of code review really showed, however, as during my work I made a mistake wherein I was almost always obtaining the wrong plane offset; I hadn’t updated the helper function that retrieves a plane’s offset to be properly multi-plane aware (it was hard coded to always return plane 0’s offset). With that fixed, we were all done and everything was ready.
Conclusion
And now we reach our final stop; NVK was finally multi-plane ready, a journey that took quite a lot of time. Overall I’d say it was tons of fun, and in the end despite getting some things wrong at first and messing up a bit, I’d say I am proud and happy about what I managed to do – this was my largest “project” to date, and my first refactor of an already-existing codebase. It was also deeply insightful and a great learning experience. Aside from the things I mentioned in the article, I learnt a lot about system design and gained some insight into the decisions that go behind creating systems like this and the tradeoffs involved. I just hope to improve further in the coming patches now.
The above doesn’t cover testing – this is because testing is directly tied to advertising format support, which is the topic of the coming article. Speaking of which, my sincere apologies for the disappearence after my first post. I wasn’t sure how to split multi-plane into multiple articles, so I elected to wait until it was all done and merged, then some family stuff came up and I had to delay this article a bit (it’s around a week overdue, now). Starting from now, articles will come in a weekly cadence, with the next one covering the second part of the project – YCbCr format support. Hope this was a pleasant read and until next time! o/